
Duco polish is a popular choice for achieving a high-gloss finish on wood and metal surfaces. It’s known for its durability, smooth finish, and resistance to wear and tear. While it’s often applied professionally, you can achieve excellent results by doing it yourself at home with the right tools and techniques. This detailed guide will walk you through the process of applying Duco polish, ensuring you get a professional-quality finish.
Materials Needed
- Duco polish: Available in spray cans or for use with spray guns.
- Primer: Necessary for a smooth base.
- Sandpaper: Various grits (180, 320, 400, 600, 800).
- Putty: For filling any imperfections.
- Masking tape: To protect areas you don’t want to be polished.
- Clean cloths: For cleaning and wiping surfaces.
- Thinner: For cleaning tools and surfaces.
- Safety gear: Gloves, mask, and safety glasses.
Step-by-Step Process to Apply Duco Polish at Home
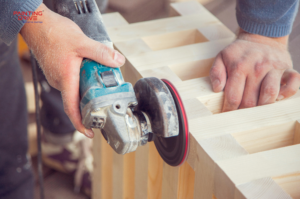
1. Preparation of the Surface
The key to a flawless Duco finish is in the preparation. This step ensures the surface is clean, smooth, and ready to receive the polish.
- Clean the Surface: Wipe down the surface with a clean cloth to remove any dust, dirt, or grease. Use a mild detergent if necessary, then allow it to dry completely.
- Sand the Surface: Begin with 180-grit sandpaper to smooth out any rough areas. Progressively move to finer grits (320, 400, 600, and finally 800) to achieve a smooth, even surface.
- Apply Putty: If there are any dents, holes, or imperfections, apply putty to fill them. Allow the putty to dry, then sand it down to ensure a smooth surface.
2. Priming the Surface
Applying a primer is essential for ensuring the Duco polish adheres properly and provides a smooth, uniform finish.
- Choose the Right Primer: Ensure the primer is compatible with Duco polish. It’s usually available in spray cans for easy application.
- Apply the Primer: Spray an even coat of primer on the surface. Hold the can at a distance of about 12 inches to avoid drips and uneven coverage. Allow the primer to dry completely (typically a few hours, but check the manufacturer’s instructions).
- Sand the Primer: Once the primer is dry, sand it lightly with 800-grit sandpaper to remove any imperfections and create a smooth base for the polish.
Know more: Paint On Wood Vs Polish On Wood : Which Is Beneficial?
3. Masking
To ensure a clean finish and protect areas you don’t want to be polished, use masking tape.
- Cover Adjacent Areas: Use masking tape to cover edges, handles, or any parts of the item that you don’t want to be polished.
4. Applying Duco Polish
This is the most critical step and requires patience and attention to detail.
- Choose Your Application Method: Duco polish can be applied using a spray can or a spray gun. Spray cans are convenient for small projects, while a spray gun is better for larger surfaces.
- First Coat: Apply the first coat of Duco polish in a light, even layer. Hold the can or gun about 12 inches from the surface and use a steady, sweeping motion. Avoid applying too much polish at once to prevent drips and runs.
- Drying Time: Allow the first coat to dry completely. This can take a few hours, depending on the humidity and temperature. Refer to the polish manufacturer’s guidelines for specific drying times.
- Sanding Between Coats: Once the first coat is dry, lightly sand the surface with 800-grit sandpaper. This step is crucial for removing any imperfections and ensuring a smooth finish.
- Subsequent Coats: Apply at least two to three more coats of Duco polish, following the same process of light, even application, drying, and sanding between coats.
5. Finishing Touches
After the final coat, give the surface one last check for any imperfections.
- Final Sanding and Buffing: Once the final coat is dry, you can lightly sand with very fine sandpaper (1200-grit or higher) if needed, followed by buffing with a soft cloth to bring out the shine.
- Remove Masking Tape: Carefully remove the masking tape to reveal clean edges.
Tips for Best Results
- Work in a Well-Ventilated Area: Ensure proper ventilation when applying Duco polish to avoid inhaling fumes.
- Maintain a Consistent Distance: Keep a consistent distance from the surface to achieve an even coat.
- Avoid Humidity: High humidity can affect the drying process and the final finish.
- Practice Patience: Allow ample drying time between coats and avoid rushing the process.
Learn more: Differences Between Duco And PU And Their Similarities
Conclusion
Applying Duco polish at home can be a rewarding DIY project that transforms your furniture, doors, or metal surfaces with a professional-quality finish. By following these steps and paying attention to detail, you can achieve a smooth, durable, and glossy surface that enhances the appearance and longevity of your items. Happy polishing!